


Sofee McLean
Fitness Trainer
ISSA-CPT, NASM-CPT
If you are just getting started on your fitness journey or getting back into it after a long break, bodyweight exercises can be a great place to start. If you’re not quite sure which exercises to choose, here are my top 10 body weight exercises for an amateur athlete. All you will need to complete these workouts is a wall, a towel or mat, and enough space to fit your body outstretched lying down. These exercises focus on building strength in the lower body. First let’s start with a breakdown of each movement, and then we’ll look at some examples of how to combine them to make a workout.
10 Lower Body Exercises for Amateur Athletes
1. Prisoner Squats to Chair or Bench
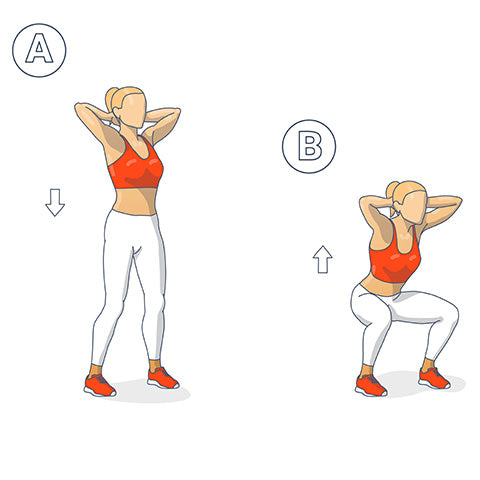
Place your hands behind your head so that your shoulders are back, and your chest is slightly forward. Sit down on a chair or bench, or for a challenge, just tap your glutes lightly, pause, and then stand back up. Make sure not to rush this exercise so that you are using your strength rather than just momentum.
2. Narrow to Wide Squats
Start with your feet slightly closer than shoulder width apart. Squat down, keeping your heels on the ground and aiming to get your hips below your knees (it’s ok if you’re not there yet! Range of motion takes practice). Stand up from your squat and then step your left foot out several inches past shoulder width. Point your toes out slightly, and squat again (you’ll find this position may allow for greater range of motion). After you are back to a standing position, repeat the narrow squat, and then step to the right for a wide squat. Continue this pattern.
3. Calf Raises
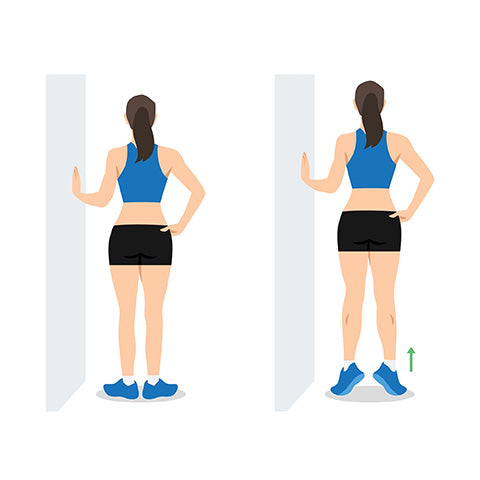
Stand close to a wall and place your hands on the wall for support. Lift your heels off the ground so that you are on your tippy toes. Hold for a count of 3, and then drop your heels to the ground. Repeat using both feet at the same time. When you are ready for an added challenge, perform this exercise with one foot at a time, wrapping your non-working leg just behind the ankle of your working leg. Make sure to keep the rep counts consistent for both legs.
4. Wall Sit
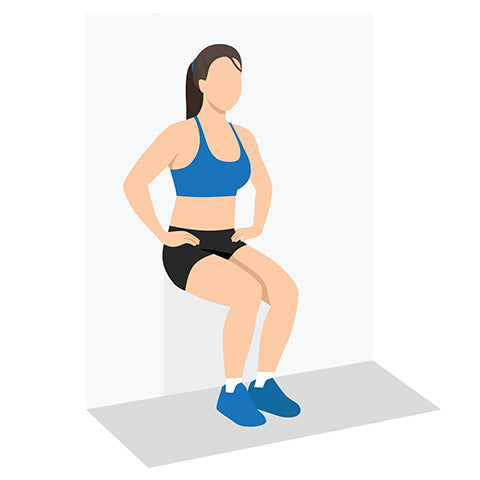
From a standing position, place your back against an empty wall. Sit down so there is a 90-degree bend in your legs while keeping your back pressed against the wall the entire time. Stay there until you reach failure. This is a great exercise to track your progress, and as you gain strength, you can even add a weight of some sort (I like to use my kids).
5. Standing Kickbacks
Stand close to a wall and place your hands on the wall for support just like the calf raises. Lift one leg off the ground, and kick straight back, keeping your hips squared. Hold your leg up for 3 seconds and squeeze your glutes. Slowly lower your leg to the ground, or if you can, keep it just above the ground. After your reps are complete, switch to the other leg and repeat the same tempo and rep count. Note: It is normal for one side to feel more challenging than the other side in any unilateral movement.
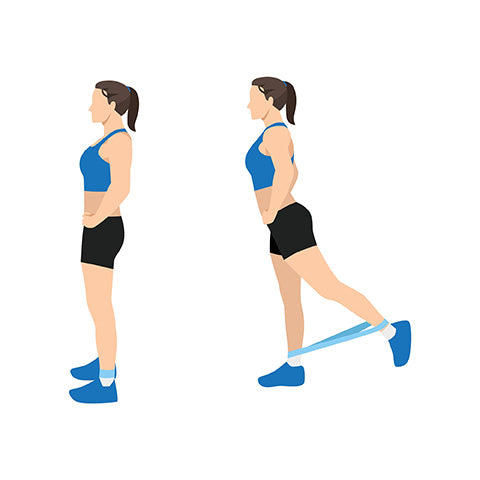
6. B-Stance Romanian Deadlifts
A B-Stance is also known as a staggered stance. The leg in front is the working leg, taking on most of the weight, while the back leg is there just for support. This is a great option to help work your way up to a single leg deadlift. Once you are in this position, hold your arms straight. Now you are in the proper starting position. Pull your shoulder blades back first, and the push your hips back as far as they will go. Think about hinging at your hips and bending your knees, while keeping your chest up and shoulder blades back. You will notice your hands sliding down your legs somewhere between your knees and mid-shin. Keep your shoulders back and your neck/spine neutral. Once you are at the position where you can no longer push your hips back anymore, stand back up straight, squeezing your glutes and hamstrings at the top (be careful not to overextend though). Imagine you are lifting a weight off the floor, and as you return to standing, drive through your legs like you are trying to push the floor away from yourself. Take this movement very slowly and master the form so that you activate the correct muscles and do not hurt your back. Once you feel comfortable with the movement, try to lift your back leg off the ground, while keeping your hips square, and/or add some weight.
7. Walking Lunges
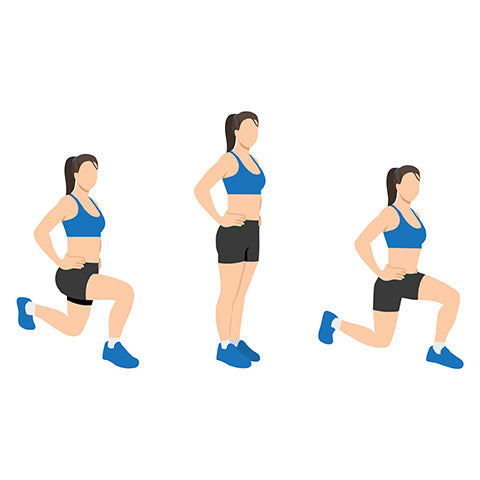
This is one of my all-time favorite exercises, because whether you’re an amateur athlete, a top-level athlete, or somewhere in-between, this movement is challenging and easy to modify or progress. If you have space to walk 10-20 steps, I recommend moving in this exercise. If you are pressed for space, you can perform this as a stationary reverse or forward lunge. A reverse lunge will target more of your posterior chain, while a forward lunge will target more of your quadriceps and core. Note that stationary forward lunges are slightly harder on your knees, so stick with reverse lunges if you have any issues with your joints.
If you are walking, take a big step forward and bend your back knee to just barely tap the floor with your heel up and toe on the ground. If you are in the proper position, your front leg should also bend to 90-degrees with your knee just above your ankle. Your front heel and toe stay connected to the ground. Stand back up and take a big step with your back leg so it’s now in front. Repeat.
If you are stationary, you can complete this move by alternating and counting your total reps, or you can approach it as a unilateral exercise, completing one side before moving on to the other side. As you master this move, add more reps/steps, add a weight, lift your knee to balance, or extend your arms overhead. All these options will be more challenging.
8. Quadruped Fire Hydrants
On your mat or towel, position your body in a quadruped stance (on hands and knees). Lift one leg laterally until your knee is in line with your hip while keeping your inner thighs pointing down toward the ground. Hold for 3 seconds, and then slowly return to your starting position. Finish your reps on one side, and then even it out on the opposite side. Your goal is to keep your hips squared and avoid opening up your hips too much.
9. Side Lying Leg Raises
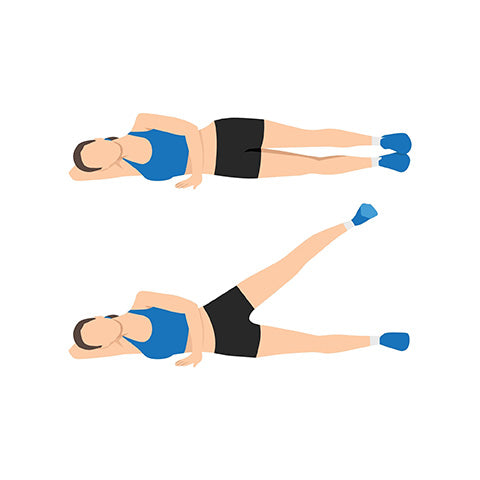
Lay on one side with both legs straight or with your bottom leg bent to make add more stability. Lift your top leg straight up about 6 inches off the ground, hold for 3 seconds, and then slowly lower it back down. Once you complete your reps on this leg, switch sides and complete the same number of reps at the same tempo on the other leg.
10. Glute Bridges

Lay on your back, and then bend your knees, keeping your feet planted on the ground. Make sure you can touch your ankles with your hands to ensure your legs are not too far forward. Feet should be slightly wider than hip width apart. Drive down through your heels and squeeze your glutes to raise your hips while keeping the rest of your body in place. Squeeze at the top for a few seconds, and then slowly lower down just above the ground. Repeat.
Putting it All Together
Now let’s put a few of the exercises together to make a quick and effective lower body workout for beginners.
30 seconds of work, 15 seconds of rest for 3 rounds of:
1. Wall Sits
2. Calf raises
3. Walking Lunges Rest 2 minutes.
Then 30 seconds of work, 15 seconds of rest for 3 rounds of:
1. Fire Hydrants – Left
2. Fire Hydrants – Right
3. Glute Bridges
The variations are endless with just these 10 basic exercises, and you can easily track your progression. I recommend starting with timed-intervals similar to the above example. You can increase your work time or number of rounds to get a clear picture of your progress to keep it simple and effective. The best part is, you don’t need any equipment to get started, and you can perform these movement indoors or outdoors. Once you are feeling like you have built up your strength, add in some dumbbells, barbells, kettlebells, or bands and, most importantly, keep going!


Add Your Name & Email
Please enter your name and email to continue.We won’t display your email publicly.