


Sydney Bueckert
Fitness Trainer
CES, FNS, GPTS, NASM-CPT
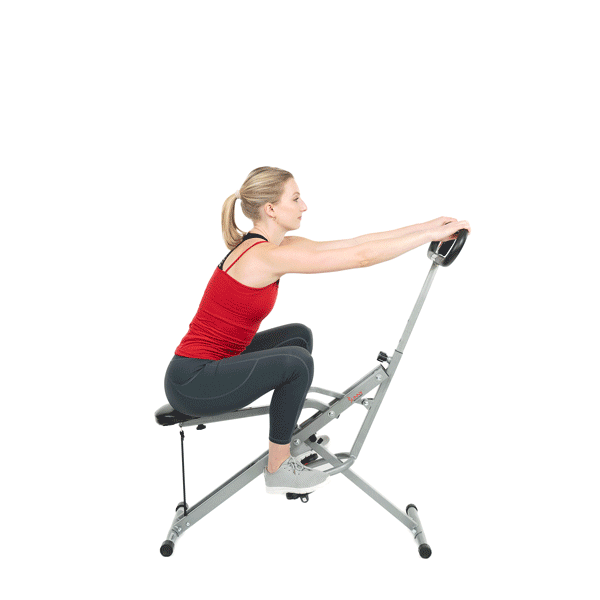
Squats are one of the best compound exercises to strengthen your lower body and build strong, lean muscle tone in your glutes, thighs, and core. And there’s no better way to level up your squat than the Upright Row-N-Ride® Rowing Machine.
If you’re ready to shake up your workout routine and achieve a serious lower body blast look no further than this 21-day Row-N-Ride squat challenge. Use this 21-day challenge to build strength and endurance in your lower body and master your Row-N-Ride squat!
How It Works
This challenge is designed to be simple and effective while helping you build strength and complete a high number of squats on your Row-N-Ride® machine. Follow these quick steps to get started:
- Master Proper Squat Form
- Commit to the 21-Day Row-N-Ride Squat Challenge
- Admire your results and tag us on social media using the hashtag #rownridechallenge
You may choose to keep up with your regular workout routine or use this challenge to build a solid base of strength as well as the motivation to get started with a regular workout schedule.
Just because you’re doing this challenge doesn’t mean you can’t continue to complete regular lower body focused workouts; however, because fitness is all about balance, you should focus on adding upper body and core workouts when you have extra time.
21 Day Row-N-Ride® Squat Challenge
A basic squat is a great exercise for toning up the lower body, but you will see better, faster results by completing a combination of squats rather than the exact same exercise over and over again.
The 21 Day Row-N-Ride Squat Challenge combines 4 different squatting exercises on your Row-N-Ride machine, to better target all of those muscles in your lower body including glutes, thighs, inner and outer thighs, hamstrings, calves, and core.
1. Squat

To complete the basic squat, sit back with your hips and squat down as far as you feel comfortable. The deeper you squat, the more your muscles will engage, so the deeper the better. Once you’ve reached your desired depth, extend back into your starting position, squeezing your glutes on the way up.
2. Pulse Squats

To complete a pulse squat, sit back into a regular squat, pause at the bottom to pulse up 2-3 inches, then drop back down into your squat. Once you’ve completed one pulse, extend back into your starting position, squeezing your glutes on the way up.
3. Plié Squat

To complete a plié squat, start with your toes pointed out to a 45-degree angle. Sit back with your hips, squatting down as far as you feel comfortable. Once you’ve reached your desired depth, extend back into your starting position, squeezing your glutes on the way up.
4. Plié Pulse Squats
To complete a plié pulse squat, point your toes out at a 45-degree angle. Sit back into a plié squat, pause at the bottom to pulse up 2-3 inches, then drop back down into your squat. Once you’ve completed one pulse, extend back into your starting position, squeezing your glutes on the way up.
Each day, you’ll have a set number of reps of each of the above exercises to complete. You’ll start off with 20 reps of each exercise, which total to 80 squats on Day 1 of the challenge, and work your way up to 200 total reps on Day 21. Follow along with the rep range provided in the chart below, but always feel free to adjust it as needed according to your schedule and fitness level.
|
DAY |
NUMBER OF REPS |
NUMBER OF SQUATS |
|
Day 1 |
20 of each |
80 Squats |
|
Day 2 |
22 of each |
88 Squats |
|
Day 3 |
24 of each |
96 Squats |
|
Day 4 |
|
Rest Day |
|
Day 5 |
26 of each |
104 Squats |
|
Day 6 |
28 of each |
112 Squats |
|
Day 7 |
30 of each |
120 Squats |
|
Day 8 |
|
Rest Day |
|
Day 9 |
32 of each |
128 Squats |
|
Day 10 |
34 of each |
136 Squats |
|
Day 11 |
36 of each |
144 Squats |
|
Day 12 |
|
Rest Day |
|
Day 13 |
38 of each |
152 Squats |
|
Day 14 |
40 of each |
160 Squats |
|
Day 15 |
42 of each |
168 Squats |
|
Day 16 |
|
Rest Day |
|
Day 17 |
44 of each |
176 Squats |
|
Day 18 |
46 of each |
184 Squats |
|
Day 19 |
48 of each |
192 Squats |
|
Day 20 |
|
Rest Day |
|
Day 21 |
50 of each |
200 Squats |
You can take as many breaks or as much rest as you need in between reps, what counts is that you get your reps in for the day! On rest days, use this 10-minute stretching routine to release tightness and tension in your lower body.
Finding the Right Row-N-Ride® Settings for You
There are plenty of ways to adjust this challenge to make it easier or harder simply by making adjustments to your Row-N-Ride. Your Row-N-Ride settings should always be selected to accommodate your current fitness and comfort level.
If you’re not sure how to adjust your Row-N-Ride, check out this Beginner’s Guide to Row-N-Ride which will get you started with everything you need to know from adjusting your machine to proper form and technique to make your workouts more effective.
Seat Height Setting
If you’re a beginner on the Row-N-Ride, feel free to complete shallower squats with the height setting at its highest. If you're more advanced you may prefer to complete this challenge with squats right at 90 degrees, or deep squats. Choose what’s right for you, you can always complete the challenge again and again making it more advanced as you get more fit.
Resistance Setting
For most, completing the challenge with one resistance band will be challenging and more than enough, however, some may prefer no resistance bands, while others may enjoy the challenge of two or three resistance bands. Again, choose a resistance level that’s appropriate for your current fitness level, and will challenge you exactly where you’re at.
Best of luck with this challenge! We can’t wait to see your results. Be sure to hashtag us #rownridechallenge so we can follow along with your progress.


Add Your Name & Email
Please enter your name and email to continue.We won’t display your email publicly.
3 comments
I was gifted one. please send me info. Super stoked. But I wanna do it right.
I bought my Row n Ride to help me fulfill my New Years resolution of losing weight. I can’t wait to post my progress in the Facebook group.
We love this machine. I have my family using it. We are getting healthy and feel great using this. It’s a tough workout my legs were throbbing but definitely better now