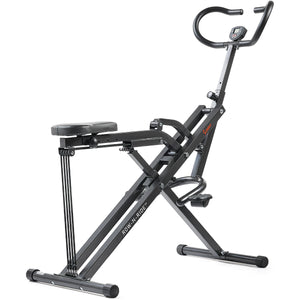
Did you know you can change the seat angle on your NO. 077 Row-N-Ride® Machine? That’s right! The Row-N-Ride® comes equipped with 3 different squat angles to accommodate different users’ needs. In this article, I’ll break down how to change your Row-N-Ride machine seat angle. Learn about which angle you should use for your workout for best results.
What Is the Right Row-N-Ride® Seat Angle for You?
When it comes to your machine’s seat angle adjustment, the most important factor is your comfort. Choose the seat angle setting you feel most comfortable using for your current fitness level, range of motion, and ability.
It’s important not to push your range of motion further than you’re ready or able to, as this could lead to discomfort or injury. Start slow. You know your body and what it needs. You can always change the angle throughout your journey to make your squats more challenging and engaging; that’s what the settings are there for.
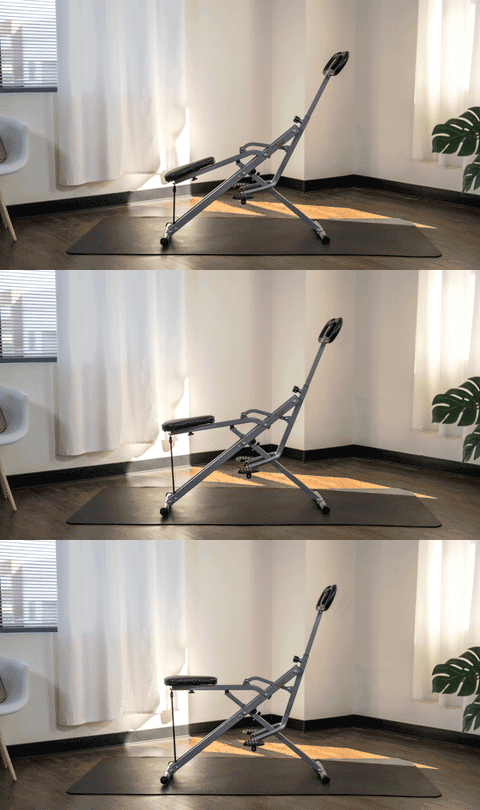
1) 90-Degree Row-N-Ride® Angle
The 90-degree angle is perfect for beginners. It is ideal for those who have a limited range of motion and prefer not to squat beyond 90 degrees. By adjusting your seat angle to the 90-degree setting, the machine will stop you right at 90 degrees. And it will not allow you to squat further.
This 90-degree setting will help control your range of motion. It is perfect for those just starting who may not have the same range of motion as more advanced users. This setting would also be great for those recovering from injury for use as a safety feature to ensure you don’t fall too deep into your squat if you’re working on building strength and control.
2) 60-Degree Row-N-Ride® Angle
The 60-degree angle is perfect for Row-N-Riders ready to take that next step and go a bit deeper in their squat. Increasing your range of motion while squatting will increase muscle engagement. All of your lower body muscles, like your glutes, quads, and hamstrings, will have to work harder to push you up and out of your squat.
Deeper squats can definitely help contribute to the results you see from your Row-N-Ride regiment. However, it’s important to remember that deep squats are done with proper form to be effective. If you don’t have the range of motion to complete deep squats properly, then it will be ideal for you to continue working at the 90-Degree Row-N-Ride angle until you’re ready to advance.
3) 30-Degree Row-N-Ride® Angle
The 30-degree setting is my favorite. Because it’s going to allow for the deepest squat, this means more challenge and more muscle engagement during your workout. The nice thing about the 30-degree setting is you have the option of squatting at any angle throughout your workout. You could squat at any angle, including the 90-degree and 60-degree, or anything in between.
Having the option will allow you to more easily vary your workout to complete deep squats, standard squats, pulses, and more! However, if you haven’t built up the strength to control your squat’s depth, and you aren’t quite ready for the depth the 30-degree angle provides; the 60-degree and 90-degree angles are going to be a bit safer for you. You won’t risk stretching yourself too far into a position that feels uncomfortable or unsafe to you by accident.
How to Adjust the Seat Angle on the NO. 077 Row-N-Ride®
Adjusting the seat angle on your machine is super simple. All you need to do to change the angle are:
- Remove the locking pin located on the upper portion of the front beam on your Row-N-Ride frame.
- Slide the internal beam up or down until the holes align, choose either the first (30-degrees), second (60-degrees), or third (90-degrees) hole depending on your desired seat angle.
- Push the locking pin back in on your desired seat angle setting to lock everything in place.






Add Your Name & Email
Please enter your name and email to continue.We won’t display your email publicly.